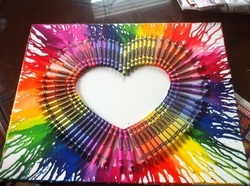
This is the worlds easiest craft to do for Mothers Day or any reason. All you need is crayons, a poster board and a hair dryer or craft blower. You will want to work in a open space so you don't get your work area dirty.
First draw a heart on your poster board. Now put newspapers all around thNext put the crayons in order- color order is the best.
Then arange them in that order on top of the heart.
After that hot glue them down.
When thats done take you dryer and blow the crayons from the bottom to the tip.And........your done!
To start, cut two 4 1/2 inch pieces of chipboard, two 5 1/2 inch pieces of paper for the covers of the book, three pieces of 8 inch square cardstock for the pages, and a 16 inch piece of ribbon. If you want a book with more inside pages, add them in odd numbers, like cutting five 8 inch squares of cardstock instead of three.
Next cover the chipboard pieces with the two sheets that you selected and cut for the front and back of the mini album. Adhere each piece of chipboard to the center of the back of each of the cover sheets, trim the corners of the papers and then wrap the edges around the chipboard. Use photo tape, extra tacky tape, or book glue to hold the paper to the chipboard. Also use a piece of photo tape to attach the center of the piece of ribbon to the middle of the back of the piece of chipboard that will be the back cover of the book.
Then, fold the 8 inch squares horizontally, vertically, abut when you fold it diagonally you can only fold it in one direction.
Then fold each square into a smaller square by creating "mountain folds" along the diagonal score lines. Bring these fold together toward the center of the square.Repeat the last step with all three 8 inch squares. Press them down and again crease very well. You will have three folded squares.
Then,open up the folded inside pages and turn one over lining them up. Line up the small squares on each piece overlapping it with a square on the next piece. Attach these squares together with photo tape to hold the pages securing in place. This will create the accordion inside pages component of the album.
Now, use photo tape to secure the folded pages to the inside of the book covers, being sure to center the pages on the inside of the book covers. The pages should completely cover the chipboard that is still showing on the back of each cover piece. The ribbon will now be sandwiched between the back cover and the inside pages. You can wrap the ribbon around the finished book and tie a bow.
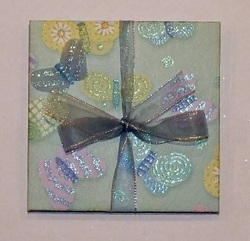
Finally, the finished book is now ready for you to embellish the inside pages with photos, journaling, stickers, rubber stamping, etc. With three inside pages sheets as shown here you will have room for six 4x4 inch photos and many, many triangular photos or journaling boxes. Remember to embellish both the front and back of the inside pages. This little gift books can be completed in less than an hour once you get the technique down. You can even create custom papers for the covers of these little books by printing logos from your favorite school, holiday clip art, birthday rubber stamps, graduation stickers, and more.
That is all there is to it!
I wanted to make a picture frame for me and my cousin and it turned out great. Here is how to make it:
Step 1:Take a square peice of paper and fold it both horizantally and vertically.
Step 2:Fold the corners into the center as you would do to a fortune teller.
Step 3:Turn the peice of paper over and fold the corners into the middle.
Step 4:Turn it over and open up the corners by sticking your fingers into them and pressing them wide open.
Step 5:Turn it over and bring the corners back so it matches the rest of the paper
Step 6: Add in a picture and you are done!

A few days ago I discovered an origami website and I wanted to share on how to make a paper heart.
Here is how you can make it:
Step 1: Start with a square piece of paper.
Step 2: Fold the paper in half by folding the top corner to the bottom corner, then unfold.
Step 3: Fold the left corner to the right corner, then unfold.
Step 4: Fold the top corner to the center
Step 5: Fold the bottom corner to the top edge.
Step 6: Fold the bottom left and right edges to the center crease.
Step 7: Fold the top and side corners back. Ta-Da! You now have a paper heart!

 RSS Feed